
Copy database and blobs to Optimizely DXP
Optimizely DXP is Optimizely's (formerly Episerver) cloud hosting solution, based on the Microsoft Azure platform. In Optimizely DXP we get three environments.
- Integration
- Preproduction
- Production
When moving a web solution from physical servers to the cloud, it is necessary to transfer the database and files (images/documents uploaded by editors) from the old servers to the cloud. Typically, this is done at least twice during a cloud migration: once when the environments are set up, and again with fresh data in connection with the final launch in the cloud.
Optimizely has had various ways to do this over the years, but there has been a trend towards increasingly self-service and developer-friendly solutions.
Create API Keys
To transfer data to the Integration environment in DXP, we need API keys, which can be created in the self-service portal, also called the PaaS portal. Click the "Add API Credentials" button under the API tab.
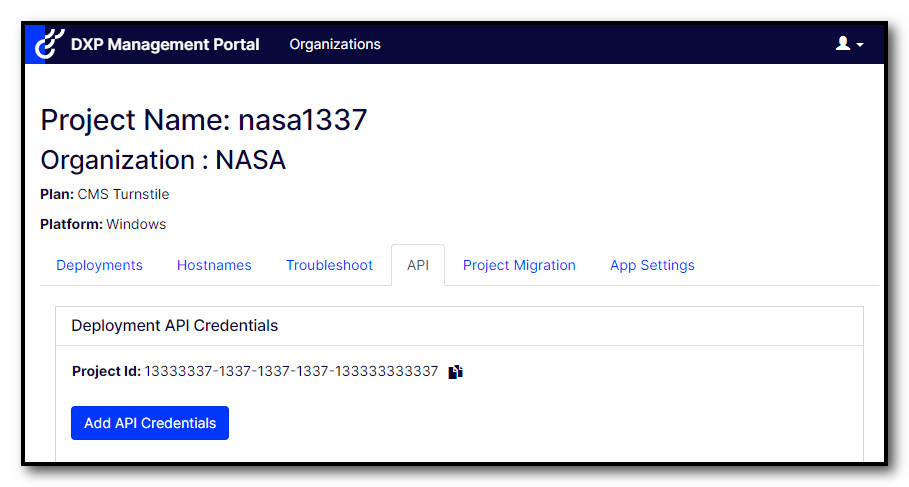
Then select "Integration" and give the key a descriptive name.
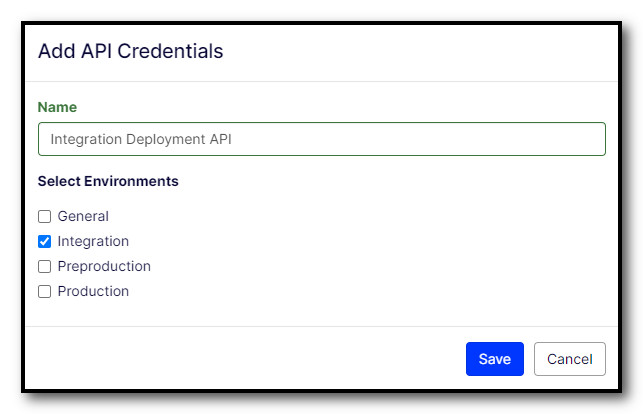
Be sure to save the API secret, which is only displayed once. You will also need the API key and Project Id, but these can be displayed later too.
Note: It is only possible to transfer databases/files directly to the integration environment. You can then use the self-service portal to move the content to preproduction. For moving databases/files to production, you can do this yourself only at the first deploy. For later updates of databases/files in production, you must contact Optimizely support.
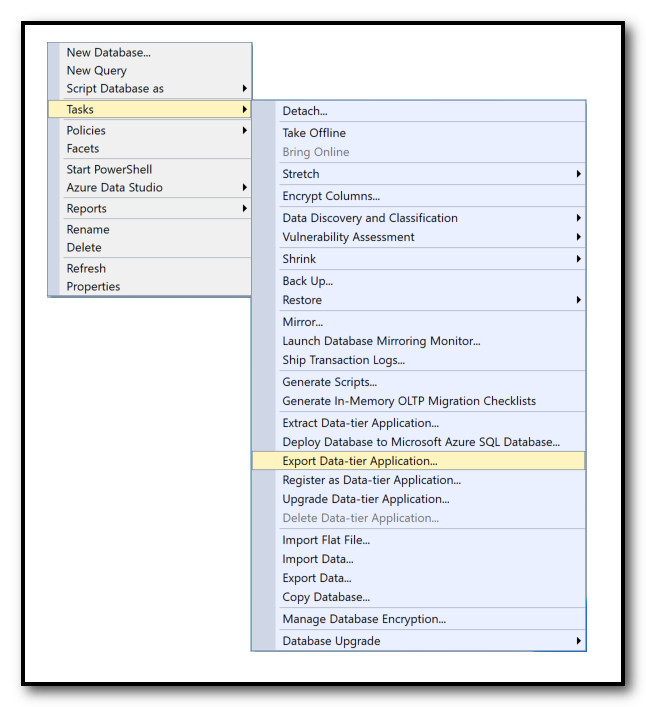
Transferring Database
The database file you transfer to DXP must be in bacpac format, which you can generate from SQL Management Studio in the following way.
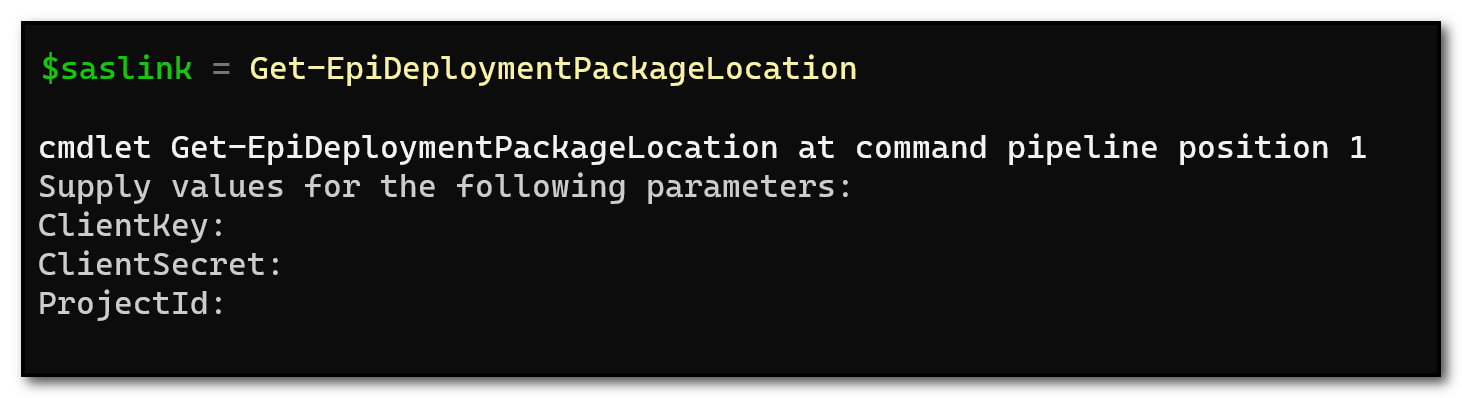
To transfer the database and files to DXP, we use the Deployment API through the Powershell module EpiCloud. You can install this module from Powershell in this way.
Install-Module -Name EpiCloudThen, the file is uploaded in the following manner. It is important that the filename is in this format, just replace the date part with today's date.
$saslink = Get-EpiDeploymentPackageLocation

Add-EpiDeploymentPackage  `
   -SasUrl $saslink `
   -Path "C:\db\integration.cms.sqldb.20231231.bacpac"
You will be asked for the values you received when you created the API key.
After the upload is complete, you start the deployment of the database to the integration environment in this way.
Start-EpiDeployment `
     -DeploymentPackage ("integration.cms.sqldb.20231231.bacpac") `
     -TargetEnvironment "Integration" -DirectDeploy
You can follow the status of the deployment in the self-service portal, and you will also receive an email when it is finished.
Transferring Files/Blobs
When transferring files, you can use the same API key as when you transferred the database. The difference here is that we use the API key to generate a SAS token with limited validity, which is used to transfer the files.
Many choose to use Azure Storage Explorer, but I have had some unfortunate experiences with transferring large amounts of data (>50GB) where Azure Storage Explorer suddenly crashes. Therefore, I prefer azcopy from the command line, where I have never experienced problems.
To create a SAS token, use the following command. The blob container in Optimizely DXP is always called "mysitemedia".
Get-EpiStorageContainerSasLink `
     -Writable `
     -Environment "Integration" `
     -StorageContainer "mysitemedia"
You must again provide the three values you received when you created the API key, and in return, you get a URL with a SAS token, similar to this.
https://nasa1337binte.blob.core.windows.net/mysitemedia?sv=2023-01-03&se=2024-12-31T23%3A59%3A00Z&sr=c&sp=rwl&sig=1337%Note that the URL may be split over two lines, with both line breaks and several spaces. You must manually remove these before using it further.
If you do not already have azcopy, you must download azcopy. Then, you can run the following command, assuming d:\blobs\ contains all the files you wish to transfer.
azcopy copy "d:\blobs\*" "https://nasa1337binte.blob.core.windows.net/mysitemedia?sv=2023-01-03&se=2024-12-31T23%3A59%3A00Z&sr=c&sp=rwl&sig=1337%" --recursive=trueUnlike the database, the files will be available in the integration environment directly after uploading.
It's that easy! 😁
For more details, look at the documentation for Storage containers and Export and import database.